Bout Review Workspace
The Bout Review Workspace places the source video beside IntegraPose's predicted events. Use it to confirm what the model got right, correct what it got wrong, and keep a clear record of which results were checked by a person.
Open it after Bout Analytics has finished. The original predictions are always preserved, even when you make corrections.
What can be reviewed
The same workspace supports two parts of the analysis.
| Review area | Use it for |
|---|---|
| Behavior bouts | Class ID behaviors for each tracked animal |
| Spatial bouts | Concurrent ROI visits, exclusive ROI-X visits, and object interactions |
Behavior and spatial review share the same video controls, event table, and timeline, but each can be completed independently. In the workspace, a review scope means one manageable set of events: the behavior bouts for one animal, or one spatial event type such as ROI visits.
How behavior bouts are constructed
Bout review begins with the intervals created during Bout Analytics.
For every tracked animal:
- Consecutive observations of the same behavior form a bout.
- Missing observations can be bridged when the gap is no larger than Maximum frame gap.
- Start and end frames are inclusive.
- The completed interval is saved only when it meets Minimum bout duration.
In mutually exclusive mode, an explicitly observed different behavior ends the current bout. IntegraPose does not bridge one behavior across a competing observed state.
Frame:      20   21   22   23   24
Observed:    A    A    B    A    A
This produces A at frames 20-21, B at frame 22, and A at frames 23-24,
subject to the selected minimum duration.
In multi-label mode, each Class ID is constructed independently. A different class can occur at the same time and does not automatically end the current class. Missing observations within each class channel can still be bridged by the selected maximum gap.
When Single Animal Analysis is enabled, IntegraPose treats the selected detection in every frame as the same animal and labels it Track 0 throughout the analysis. The original inference labels are not changed.
The detailed bout table records observed frames, bridged frames, the largest bridged gap, the selected thresholds, and the analysis FPS. An empty table with the expected columns means that no bout met the selected minimum; it does not mean that analysis was skipped.
Before opening the reviewer
Before opening the workspace, confirm that:
- Bout Analytics or the Batch Processing Wizard completed successfully
- you selected the completed result for the correct video
- the analysis FPS is correct
- behavior and spatial duration thresholds were selected before analysis
- tracked animal identities are sufficiently stable for the planned outcome
IntegraPose first uses the annotated analytics video when it is available. If that video was not generated, the reviewer uses the original source video. A different source-video folder can be selected from the reviewer if both recorded paths need to be repaired.
Wait for Bout Analytics to report that the job is complete before opening the reviewer. Once an analysis is complete, the workspace reopens from its saved tables; it does not need to reread every frame-level YOLO text file.
Open the correct analysis run
From Bout Analytics
After Process & Analyze Bouts, use:
- Review Behavior Bouts
- Review ROI / Object Bouts
Tab 6 opens the most recent completed Bout Analytics run and starts the reviewer in the selected profile.
From the Batch Processing Wizard
Select one completed video in the queue, then use:
- Review Behavior Bouts
- Review ROI / Object Bouts
The Batch Wizard opens the selected video's run_manifest.json. Reviews are
stored with that individual analysis run, so reviewing one video does not
alter another video's decisions.
The Tab 6 and Batch Wizard buttons open the same reviewer. Opening the same run from either location resumes the same saved review state.
Learn the workspace
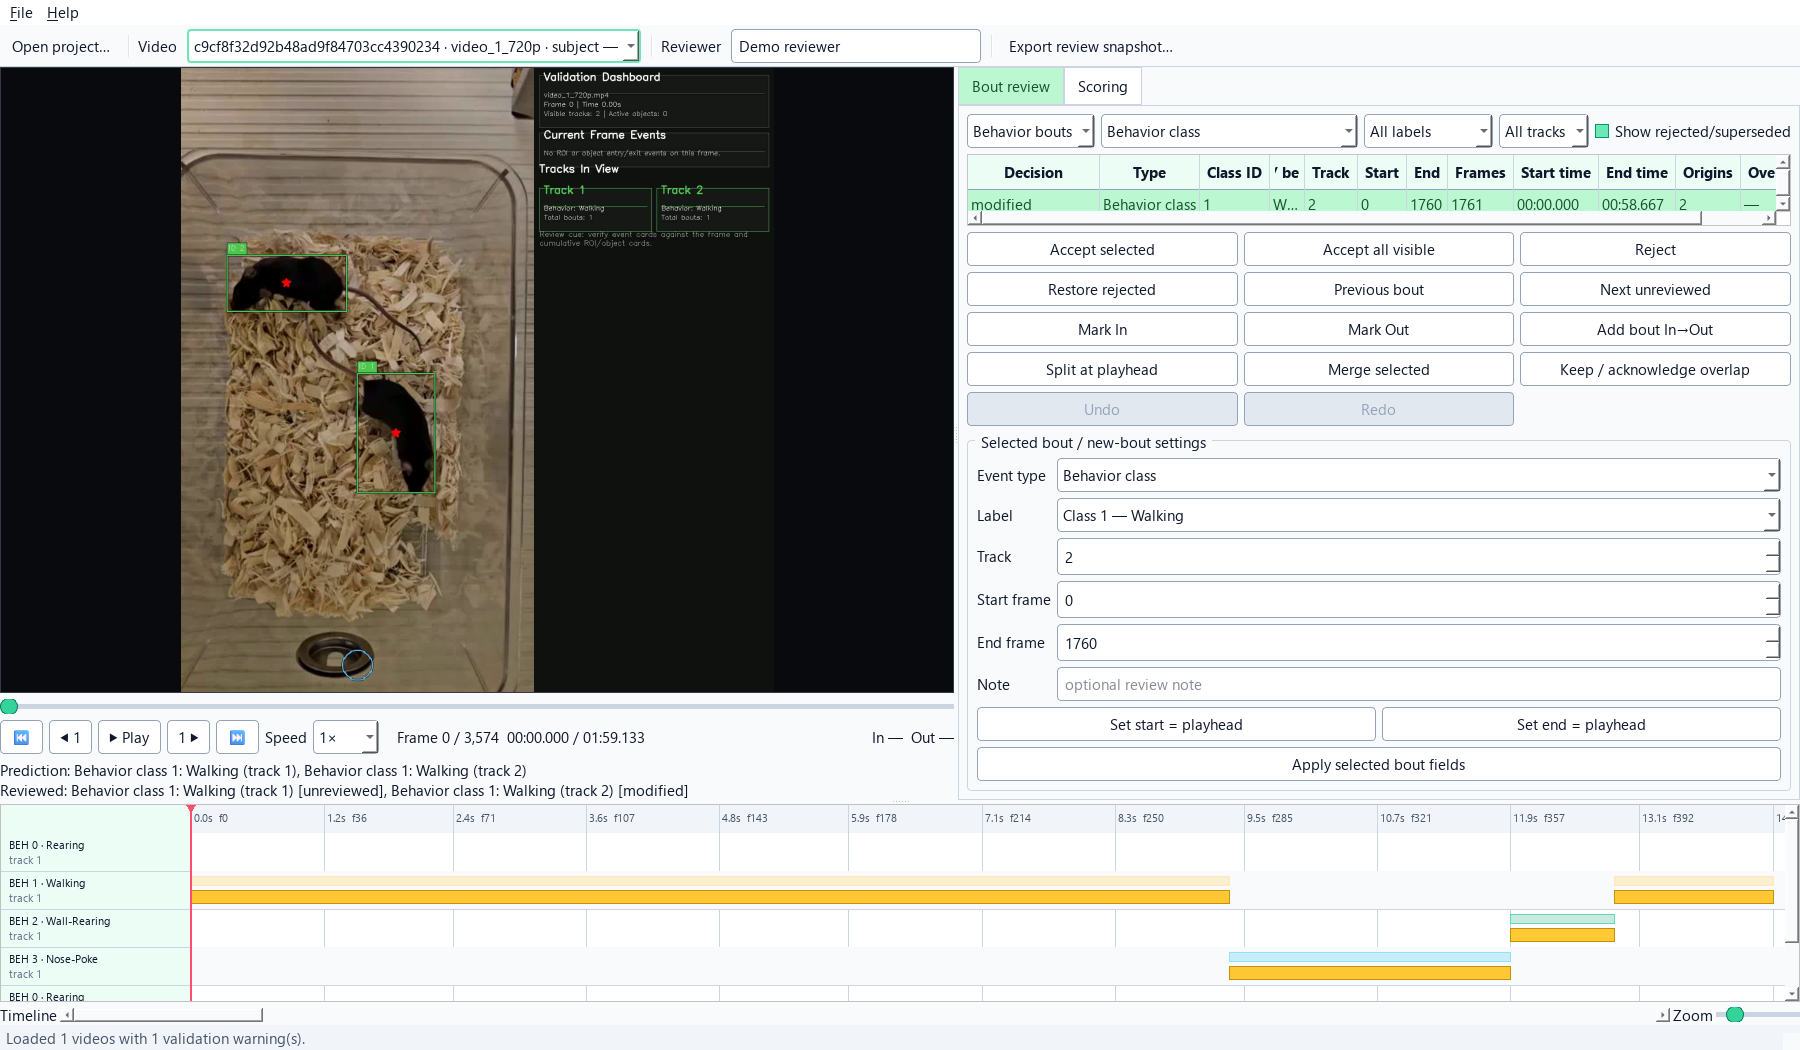
The workspace has four main areas:
- Video and playback controls - play, pause, scrub, change speed, or move one frame at a time.
- Bout table and filters - choose the review profile, event type, label, and track ID.
- Correction controls - confirm, reject, relabel, correct track IDs, adjust boundaries, add, split, or merge bouts.
- Timeline - compare the original prediction with the current reviewed result across behaviors and tracked animals.
Enter reviewer initials or a reviewer ID before making decisions. This identity is saved in the review history.
Adjust the workspace layout
Drag the divider between the video and review panel to change their widths. Drag the divider above the timeline to change its height. The wider divider handles change color when the pointer is over them.
Use the View menu to show or hide:
- Video and playback
- Review and scoring panel
- Timeline
Table columns can be resized and reordered from their headers. IntegraPose remembers the window position, pane sizes, visible panels, and table-column layout for the next reviewer session. On smaller screens, the review and scoring pages provide scroll bars instead of forcing the window beyond the desktop.
Choose View -> Reset layout, or press Ctrl+Shift+0, to restore every
panel, the default column order and widths, and a window size fitted to the
current screen. A saved window position that no longer intersects an attached
display is moved back onto the primary screen automatically.
Read the timeline
The timeline separates the model prediction from the current reviewed result:
- the upper, thinner interval is the original IntegraPose prediction
- the lower interval is the active reviewed bout
- different rows represent behavior classes and tracked animals, or spatial event types and tracked animals
The original interval does not move when a boundary is corrected. This makes the size and direction of the correction visible.
Recommended review sequence
For each video:
- Choose Behavior bouts or Spatial bouts.
- Select one event type and one track when applicable.
- Use Next unreviewed to move through the predicted bouts.
- Inspect the video before, during, and after the proposed event.
- Confirm the bout or make the required correction.
- Review flagged behavior overlaps.
- Check the scoring page for unresolved predictions.
- Mark the applicable scope complete.
- Export a review snapshot.
Edits are saved automatically with the analysis run. You must still export the completed review before IntegraPose uses the reviewed tables as its preferred results.
Confirm and correct bouts
| Action | When to use it |
|---|---|
| Accept selected | The predicted class, track, and boundaries are correct |
| Reject | The predicted event did not occur |
| Restore rejected | A rejected bout should return to active review |
| Set start/end = playhead | A boundary should be aligned to the current video frame |
| Apply selected bout fields | Change the class, label, track ID, boundary, or note |
| Mark In / Mark Out | Define the inclusive start and end of a missing event |
| Add bout In->Out | Add an event that IntegraPose did not predict |
| Split at playhead | One prediction contains two biologically separate events |
| Merge selected | Several intervals represent one continuous event |
| Keep / acknowledge overlap | Concurrent behaviors were inspected and intentionally retained |
| Undo / Redo | Reverse or restore an edit made during the current session |
Start and end frames are inclusive. A bout from frame 10 through frame 14 therefore contains 5 frames.
Correct a boundary
- Select the bout.
- Move the playhead to the correct first or last frame.
- Choose Set start = playhead or Set end = playhead.
- Add a note when the reason for the boundary choice may be useful later.
- Choose Apply selected bout fields.
Correct a behavior class
Select the intended behavior in Label, then apply the edited fields. IntegraPose records both the predicted class and the corrected class. These changes contribute to the per-behavior correction summary.
Correct a track ID
Change Track when the behavior belongs to a different animal. The review record retains the original track assignment and identifies the change as a track correction.
Tracking corrections in the reviewer apply to the reviewed bout. They do not rewrite the original frame-level tracker output.
Split and merge
Split a bout when one continuous prediction contains two distinct biological events. Merge bouts when separate intervals should be treated as one event.
Behavior bouts can merge only when they have the same class, label, and track ID. If one bout was assigned the wrong class or track, correct it first and then merge it with the compatible bout.
Choose how behavior classes are constructed
The behavior-class mode is selected before Bout Analytics constructs bouts.
| Mode | Interpretation | Typical use |
|---|---|---|
| Mutually exclusive | One highest-confidence class is retained for each track and frame | The assay defines behaviors as competing states |
| Multi-label | Each Class ID is constructed independently, so different behaviors can overlap for the same track | Behaviors can legitimately co-occur, such as rearing and wall-rearing |
The selected mode is recorded in run_manifest.json.
The reviewer cannot recover a simultaneous prediction that was discarded during mutually exclusive bout construction. Select multi-label mode before analysis when concurrent behavior classes are scientifically meaningful.
Review multi-animal behavior
Track ID anchors each behavior prediction to an animal. Use the track filter to review one animal at a time.
The reviewer flags same-track temporal overlaps for inspection:
- different-class overlaps can represent legitimate concurrent behavior
- same-class overlaps more often indicate a duplicate or an event that should be merged
An overlap warning is not an automatic error. Keep both bouts when they are biologically appropriate and choose Keep / acknowledge overlap to record that decision.
Review ROI and object bouts
Spatial review keeps three event types separate.
| Event type | Meaning |
|---|---|
| ROI | Concurrent membership; nested or overlapping ROIs can all receive credit |
| ROI-X | Exclusive membership; one primary ROI is assigned at a time |
| Object interaction | Contact or proximity defined by the selected pose keypoint and object boundary |
Review ROI and ROI-X separately because they answer different questions. Changing one does not silently change the other.
For an ROI analysis to become complete, review and complete both the concurrent ROI and exclusive ROI-X scopes. Object-interaction review has its own completion state.
Complete a review scope
The scoring page reports review progress and labels each result PROVISIONAL or FINAL. Provisional means the review is still in progress; final means every prediction in that review scope has a decision and the scope was explicitly marked complete.
For behavior bouts:
- choose one track in the track filter
- decide every original prediction for that track
- mark that behavior-track scope complete
- repeat for every tracked animal
For spatial bouts:
- choose one event type rather than All spatial event tracks
- decide every original prediction for that event type
- mark the selected event-type scope complete
A scope can be reopened if additional correction is needed.
Do not report provisional scores as completed validation
Saved edits can be resumed, but prediction-to-review measurements remain provisional until every relevant review scope is marked complete.
Export and activate reviewed results
Choose Export review snapshot or press Ctrl+E.
In this context, a review snapshot is an export of the tables, figures, and review history as they stand at that time. Each export is written to a new dated folder:
bout_review_exports/
`-- IntegraPose_bout_review_<timestamp>/
Exports separate:
Behavior_Bouts/ROI_Bouts/Object_Interactions/Shared_Audit/
The export includes an index, original predictions, current decisions, corrected bouts, prediction-to-review measurements, correction summaries, figures, and a review history when those outputs apply.
Only completed review scopes become preferred IntegraPose results. The run's
run_manifest.json records which reviewed tables to use. Incomplete scopes
remain provisional and do not replace the original automatic analysis.
The original prediction tables are preserved.
For a batch project, return to the Batch Processing Wizard and choose Finalize Reviewed Results after all required videos and scopes are complete. This rebuilds the batch workbook, coverage table, statistics, and figures from the reviewed results.
Understand the temporal-overlap score (tIoU)
Temporal intersection-over-union, shortened to tIoU, measures how much a predicted bout and reviewed bout overlap in time:
overlapping frames / frames covered by either bout
A tIoU of:
1.00means the temporal boundaries match exactly0.50means half of the combined interval overlaps0.00means the events do not overlap
The default matching threshold is 0.50. At that threshold, a prediction and
reviewed event are treated as a matched pair when their tIoU is at least 0.50.
Enable Advanced tIoU sweep to report results at 0.25, 0.50, 0.75,
and 0.95. The sweep shows whether conclusions remain stable as stricter
boundary agreement is required.
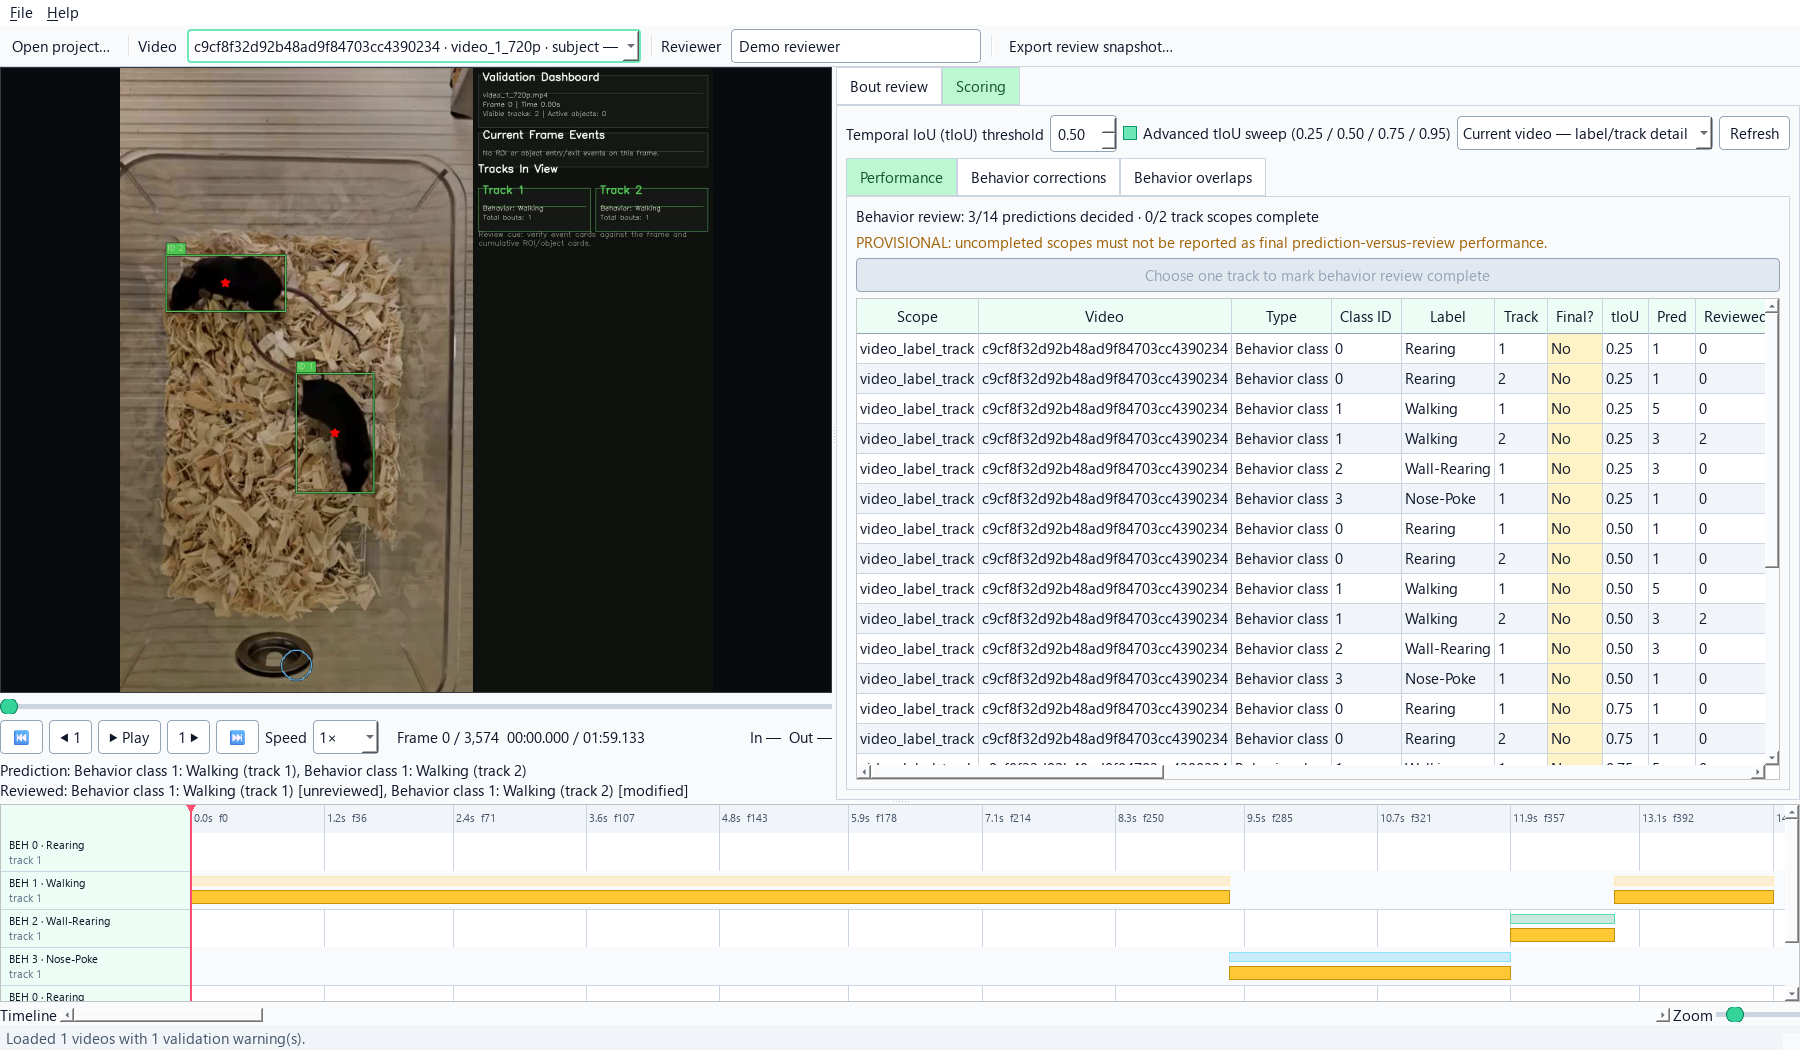
Use these scores as prediction-to-review agreement, not as independent biological ground truth. The reference is the set of events created during this manual review.
See Metrics Reference for event, frame, boundary, and agreement metric definitions.
Examine behavior-specific corrections
The Behavior corrections page summarizes how often each class required:
- boundary correction
- reclassification from or into that behavior
- track correction
- rejection
- splitting or merging
- manual addition
Counts are tied to unique original bouts so repeated button clicks do not inflate the correction rate.
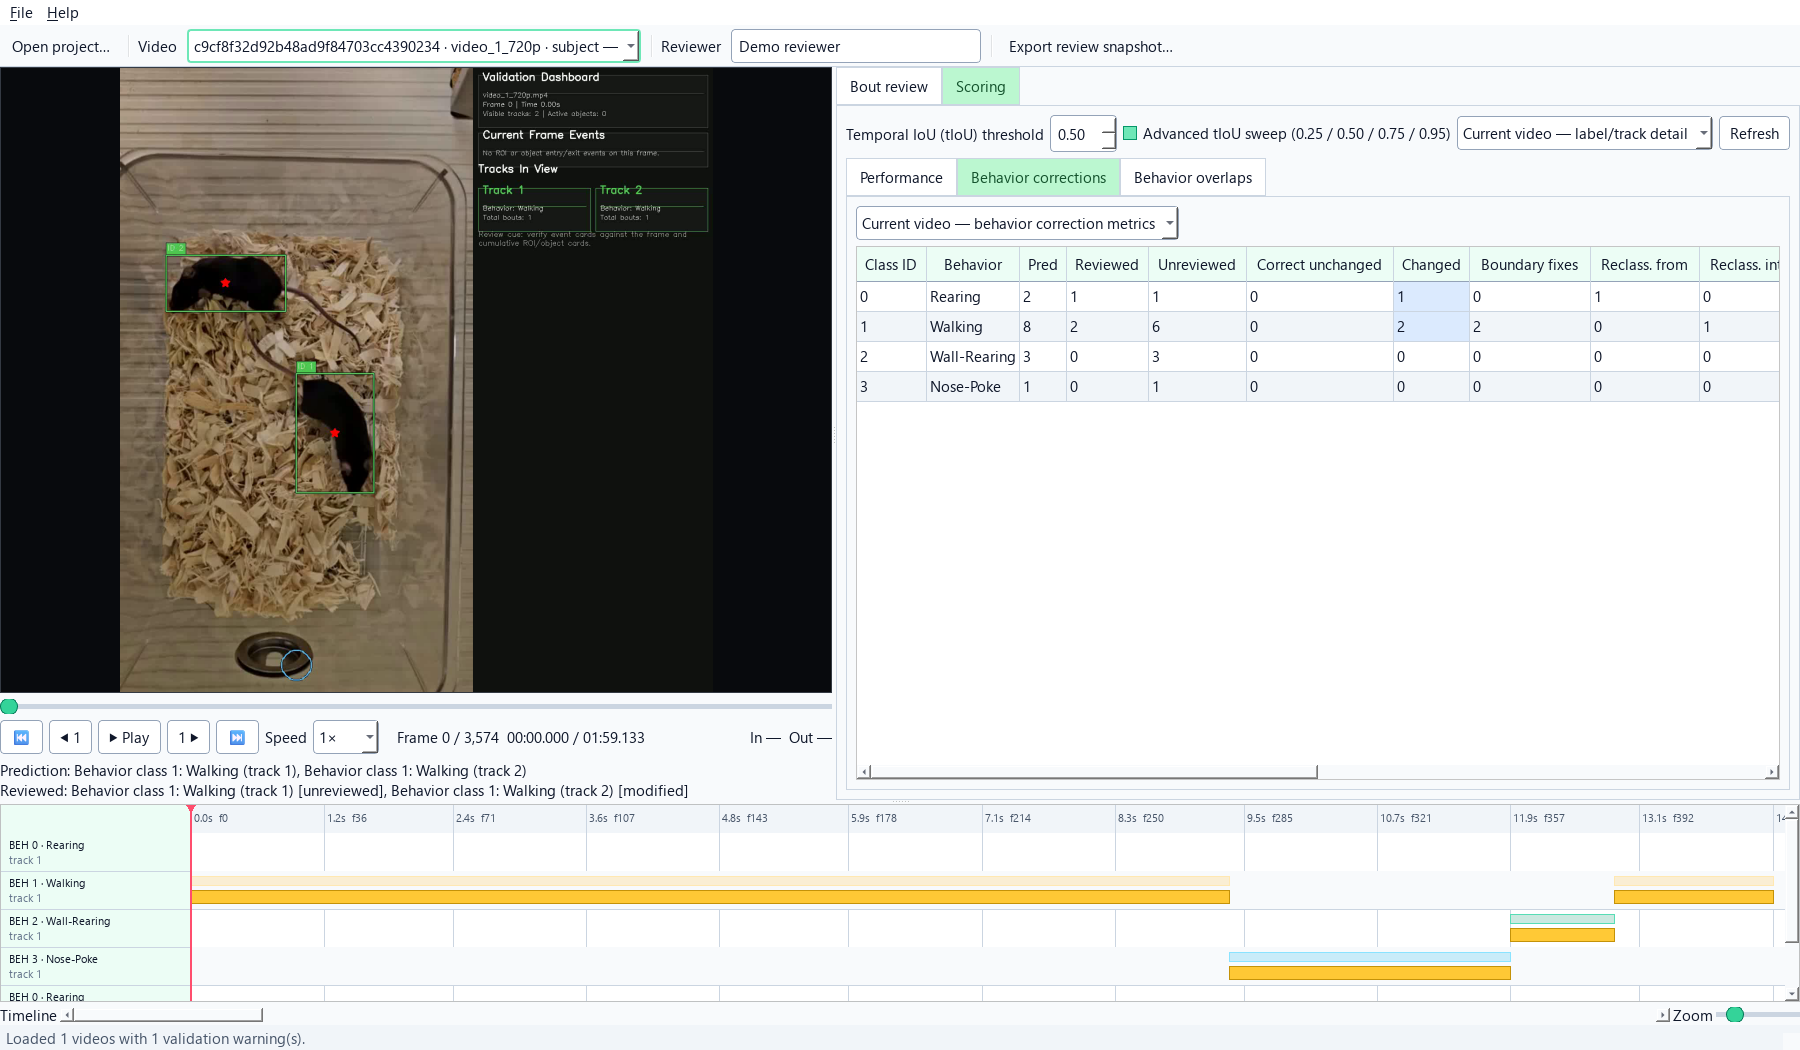
Use these results to identify classes that require model refinement or a clearer operational definition.
Keep reviewed results together
Keep the complete analytics folder together. Important review files include:
run_manifest.json
bout_review_workspace/
|-- IntegraPose_bout_review.sqlite3
`-- last_review_status.json
bout_review_exports/
The workspace database lets you resume an unfinished review. Export folders are dated copies for analysis and archiving; you normally do not need to open or edit the database itself.
IntegraPose records both the original file locations and locations within the analysis folder. If the run is moved to another computer or external drive, open the copied analytics folder rather than an isolated CSV.
Keep either:
- the annotated analytics video, or
- the original source video
If neither path resolves after a move, choose File -> Set source-video folder in the reviewer.
See Project Files And Reproducibility Bundles for the difference between saving the GUI configuration and archiving analysis outputs.
Integrated reviewer versus Manual Bout Scorer
Use the Bout Review Workspace when correcting IntegraPose predictions and producing reviewed results for later IntegraPose summaries.
Use Manual Bout Scorer when creating a separate exploratory or fully manual event table. Its CSV remains separate and does not automatically replace the detected or reviewed analytics tables.
See Manual Bout Scorer.
Practical review checklist
- Confirm the correct video and run before editing.
- Enter a reviewer ID.
- Check the analysis FPS and inclusive frame convention.
- Review one track and event type at a time.
- Inspect neighboring frames before changing a boundary.
- Correct class and track assignments before merging.
- Resolve or acknowledge same-track behavior overlaps.
- Confirm that every prediction has a final decision.
- Mark each required scope complete.
- Export a timestamped snapshot.
- Finalize the batch workbook when batch-level results are needed.
- Archive the full analytics folder rather than isolated reviewed CSV files.